Replacing a shower faucet can be a relatively simple task that can be completed in a few hours. By following these steps, you can save yourself the cost of hiring a plumber.
Before you begin, you will need to gather a few tools and materials. These include a Phillips head screwdriver, a flat head screwdriver, a pair of adjustable pliers, and a new shower faucet. Once you have gathered your tools and materials, you can begin the process of removing your old shower faucet.
- Turn off the water supply to your shower. This is typically done by turning the handle on the shut-off valve located under your sink.
- Remove the handle from your shower faucet. This is typically done by unscrewing the set screw that is located on the side of the handle.
- Remove the escutcheon plate from your shower faucet. This is typically done by unscrewing the screws that are located around the perimeter of the plate.
- Remove the cartridge from your shower faucet. This is typically done by unscrewing the retaining nut that is located on the back of the cartridge.
- Remove the old shower faucet from your shower. This is typically done by unscrewing the nuts that are located on the back of the faucet.
- Install the new shower faucet in your shower. This is typically done by screwing the nuts that are located on the back of the faucet.
- Install the cartridge in your shower faucet. This is typically done by screwing the retaining nut that is located on the back of the cartridge.
- Install the escutcheon plate on your shower faucet. This is typically done by screwing the screws that are located around the perimeter of the plate.
- Install the handle on your shower faucet. This is typically done by screwing the set screw that is located on the side of the handle.
- Turn on the water supply to your shower and check for leaks. If there are any leaks, tighten the nuts or screws that are located on the back of the faucet until the leak stops.
Replacing a shower faucet is a relatively simple task that can be completed in a few hours. By following these steps, you can save yourself the cost of hiring a plumber.
Read also:Benjamin Millepied And Camille Eacutetienne A Dynamic Duo In Art And Activism
How to Remove Shower Faucet
Removing a shower faucet is a relatively simple task that can be completed in a few hours. By following these steps, you can save yourself the cost of hiring a plumber.
- Tools: You will need a few tools to remove your shower faucet, including a Phillips head screwdriver, a flat head screwdriver, a pair of adjustable pliers, and a new shower faucet.
- Safety: Before you begin, turn off the water supply to your shower. This is typically done by turning the handle on the shut-off valve located under your sink.
- Handle: Remove the handle from your shower faucet. This is typically done by unscrewing the set screw that is located on the side of the handle.
- Escutcheon: Remove the escutcheon plate from your shower faucet. This is typically done by unscrewing the screws that are located around the perimeter of the plate.
- Cartridge: Remove the cartridge from your shower faucet. This is typically done by unscrewing the retaining nut that is located on the back of the cartridge.
- Faucet: Remove the old shower faucet from your shower. This is typically done by unscrewing the nuts that are located on the back of the faucet.
Once you have removed your old shower faucet, you can install the new one by following these steps in reverse order. Be sure to tighten all of the nuts and screws securely to prevent leaks.
1. Tools
In order to remove a shower faucet, certain tools are required. These tools enable the user to safely and efficiently disassemble the shower faucet, and include a Phillips head screwdriver, a flat head screwdriver, a pair of adjustable pliers, and a new shower faucet. Each of these tools serves a specific purpose in the removal process.
- Phillips Head Screwdriver: This screwdriver is used to remove the screws that secure the handle and escutcheon plate to the shower faucet.
- Flat Head Screwdriver: This screwdriver is used to pry off the escutcheon plate from the shower faucet.
- Adjustable Pliers: These pliers are used to loosen and remove the nuts that secure the shower faucet to the shower arm.
- New Shower Faucet: The new shower faucet is the replacement part that will be installed in place of the old shower faucet.
Having the right tools for the job is essential when removing a shower faucet. Using the correct tools will help to prevent damage to the shower faucet, the shower arm, and the surrounding area. It will also help to ensure that the new shower faucet is installed correctly and securely.
2. Safety
Turning off the water supply is a crucial safety precaution when removing a shower faucet. Water pressure can cause the faucet to spray water when it is disconnected, which can be dangerous and cause damage. Shutting off the water supply ensures that the faucet is safe to handle and prevents any unexpected water flow.
Additionally, turning off the water supply prevents water damage to the bathroom or surrounding areas. If the faucet is leaking or if a pipe is accidentally disconnected, having the water turned off will minimize the amount of water that escapes and causes damage.
Read also:Why Small Tattoos For Women Are A Meaningful Expression Of Individuality
In summary, turning off the water supply before removing a shower faucet is essential for safety and to prevent water damage. It is a simple step that can help to ensure a smooth and safe faucet removal process.
3. Handle
Removing the handle is an essential step in the process of removing a shower faucet. The handle is the part of the faucet that you use to control the flow of water, and it is typically secured to the faucet body by a set screw. Unscrewing this set screw allows you to remove the handle and access the rest of the faucet.
- Identifying the set screw: The set screw is typically located on the side of the handle, near the base. It is usually a small screw, and it may be covered by a cap or plug.
- Using the correct tool: To remove the set screw, you will need to use a Phillips head screwdriver or a hex key. The size of the screwdriver or hex key will vary depending on the size of the set screw.
- Unscrewing the set screw: Once you have identified the set screw and selected the correct tool, you can begin to unscrew it. Turn the screwdriver or hex key counterclockwise until the set screw is completely removed.
- Removing the handle: Once the set screw is removed, you should be able to pull the handle straight off of the faucet body. If the handle is stuck, you may need to wiggle it back and forth until it comes loose.
Removing the handle is a relatively simple task, but it is important to do it carefully to avoid damaging the handle or the faucet body. By following these steps, you can safely remove the handle from your shower faucet and proceed with the rest of the removal process.
4. Escutcheon
The escutcheon plate is a decorative cover that conceals the base of the shower faucet and the holes where the faucet is mounted to the wall. Removing the escutcheon plate is an essential step in the process of removing a shower faucet, as it allows you to access the nuts that secure the faucet to the wall.
To remove the escutcheon plate, you will need to use a screwdriver to unscrew the screws that are located around the perimeter of the plate. Once the screws are removed, you should be able to pull the escutcheon plate straight off of the wall.
Removing the escutcheon plate is a relatively simple task, but it is important to do it carefully to avoid damaging the plate or the wall. By following these steps, you can safely remove the escutcheon plate from your shower faucet and proceed with the rest of the removal process.
Here are some additional tips for removing the escutcheon plate:
- If the escutcheon plate is stuck, you may need to use a putty knife or a flathead screwdriver to pry it loose.
- Be careful not to scratch the wall when removing the escutcheon plate.
- If you are having difficulty removing the escutcheon plate, you may need to call a plumber for assistance.
Removing the escutcheon plate is an important step in the process of removing a shower faucet. By following these steps, you can safely and easily remove the escutcheon plate and proceed with the rest of the removal process.
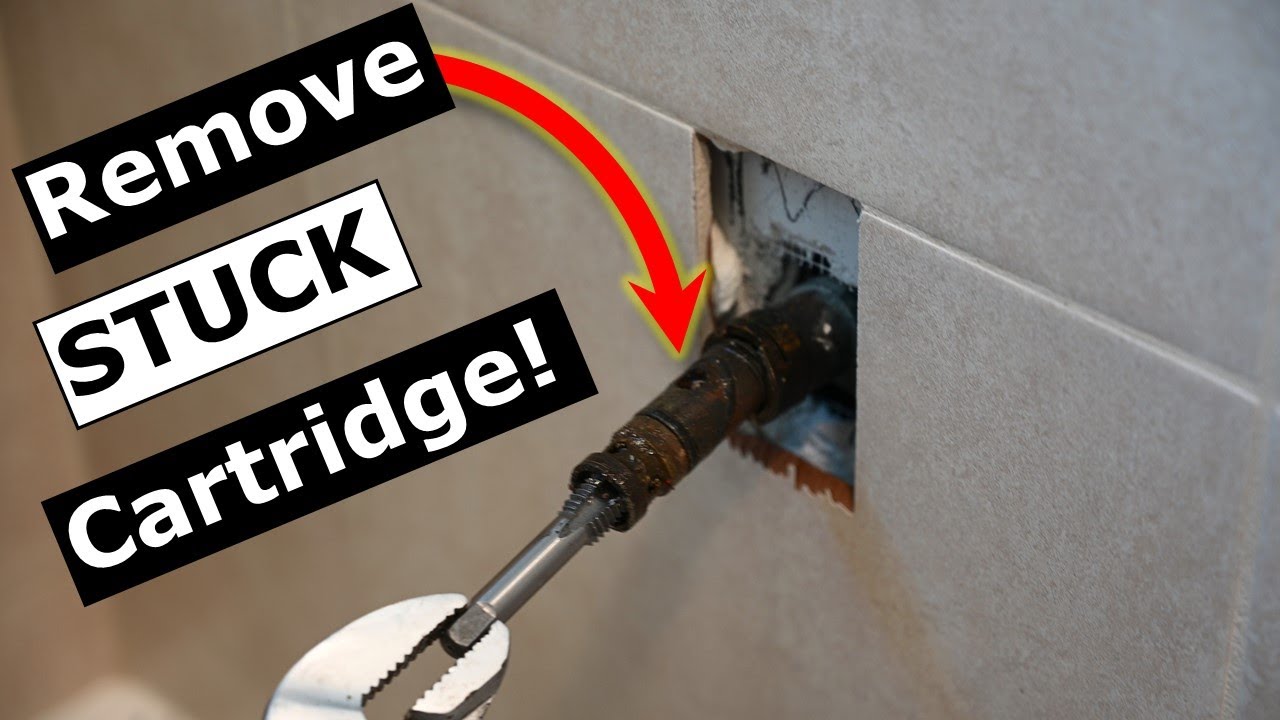
5. Cartridge
Removing the cartridge is a crucial step in the process of removing a shower faucet. The cartridge is the part of the faucet that controls the flow of water, and it is typically secured to the faucet body by a retaining nut. Unscrewing this retaining nut allows you to remove the cartridge and access the rest of the faucet.
To remove the cartridge, you will need to use a wrench to loosen the retaining nut. Once the retaining nut is loose, you should be able to pull the cartridge straight out of the faucet body.
Removing the cartridge can be a bit tricky, but it is important to do it carefully to avoid damaging the cartridge or the faucet body. By following these steps, you can safely remove the cartridge from your shower faucet and proceed with the rest of the removal process.
Here are some additional tips for removing the cartridge:
- If the cartridge is stuck, you may need to use a pair of pliers to gently pry it loose.
- Be careful not to scratch the faucet body when removing the cartridge.
- If you are having difficulty removing the cartridge, you may need to call a plumber for assistance.
Removing the cartridge is an important step in the process of removing a shower faucet. By following these steps, you can safely and easily remove the cartridge and proceed with the rest of the removal process.
6. Faucet
Removing the old shower faucet is a crucial step in the process of replacing it. The nuts that secure the faucet to the shower arm are typically located on the back of the faucet. By unscrewing these nuts, you can detach the old faucet and make way for the new one.
This step is important because it allows you to access the plumbing connections behind the faucet. Once the faucet is removed, you can disconnect the water supply lines and remove the old shower arm. This will give you the opportunity to inspect the plumbing and make any necessary repairs before installing the new faucet.
In some cases, the nuts that secure the faucet may be difficult to remove. This is especially true if the faucet has been in place for a long time. If you are having difficulty removing the nuts, you may need to use a wrench or pliers to loosen them. Be careful not to damage the nuts or the faucet when using tools.
Once the nuts are removed, you should be able to pull the old faucet straight off of the shower arm. If the faucet is stuck, you may need to wiggle it back and forth until it comes loose.
Removing the old shower faucet is a relatively simple task, but it is important to do it carefully to avoid damaging the plumbing or the faucet itself. By following these steps, you can safely remove the old faucet and proceed with the installation of the new one.
FAQs about How to Remove Shower Faucet
Removing a shower faucet can seem like a daunting task, but it is actually a relatively simple process that can be completed in a few hours. To help you get started, we have compiled a list of frequently asked questions about how to remove a shower faucet.
Question 1: What tools do I need to remove a shower faucet?You will need a few tools to remove a shower faucet, including a Phillips head screwdriver, a flat head screwdriver, a pair of adjustable pliers, and a new shower faucet.
Question 2: How do I turn off the water supply to my shower?Before you begin, turn off the water supply to your shower. This is typically done by turning the handle on the shut-off valve located under your sink.
Question 3: How do I remove the handle from my shower faucet?Remove the handle from your shower faucet. This is typically done by unscrewing the set screw that is located on the side of the handle.
Question 4: How do I remove the escutcheon plate from my shower faucet?Remove the escutcheon plate from your shower faucet. This is typically done by unscrewing the screws that are located around the perimeter of the plate.
Question 5: How do I remove the cartridge from my shower faucet?Remove the cartridge from your shower faucet. This is typically done by unscrewing the retaining nut that is located on the back of the cartridge.
Question 6: How do I remove the old shower faucet from my shower?Remove the old shower faucet from your shower. This is typically done by unscrewing the nuts that are located on the back of the faucet.
These are just a few of the most frequently asked questions about how to remove a shower faucet. If you have any other questions, please consult a qualified plumber.
Removing a shower faucet is a relatively simple task that can be completed in a few hours. By following these steps, you can save yourself the cost of hiring a plumber.
Tips for Removing a Shower Faucet
Removing a shower faucet can be a daunting task, but it is actually a relatively simple process that can be completed in a few hours. To help you get started, we have compiled a list of tips for removing a shower faucet.
Tip 1: Gather your tools.Before you begin, make sure you have all the tools you need. You will need a Phillips head screwdriver, a flat head screwdriver, a pair of adjustable pliers, and a new shower faucet.Tip 2: Turn off the water supply.Before you begin, turn off the water supply to your shower. This is typically done by turning the handle on the shut-off valve located under your sink.Tip 3: Remove the handle.Remove the handle from your shower faucet. This is typically done by unscrewing the set screw that is located on the side of the handle.Tip 4: Remove the escutcheon plate.Remove the escutcheon plate from your shower faucet. This is typically done by unscrewing the screws that are located around the perimeter of the plate.Tip 5: Remove the cartridge.Remove the cartridge from your shower faucet. This is typically done by unscrewing the retaining nut that is located on the back of the cartridge.Tip 6: Remove the old shower faucet.Remove the old shower faucet from your shower. This is typically done by unscrewing the nuts that are located on the back of the faucet.Summary of Key Takeaways:Gather all the necessary tools before starting. Turn off the water supply to the shower. Remove the handle, escutcheon plate, and cartridge before removing the old faucet. Follow the steps in the correct order to avoid damaging the faucet or shower.By following these tips, you can safely and easily remove a shower faucet.Transition to the article's conclusion:
Removing a shower faucet is a relatively simple task that can be completed in a few hours. By following these tips, you can save yourself the cost of hiring a plumber.
Conclusion
Removing a shower faucet is a relatively simple task that can be completed in a few hours. By following the steps outlined in this article, you can save yourself the cost of hiring a plumber. However, it is important to note that if you are not comfortable working with plumbing, it is always best to consult a qualified professional.
With a little bit of preparation and the right tools, you can easily remove your old shower faucet and install a new one. This can be a great way to update the look of your bathroom or to replace a faulty faucet. Just be sure to follow the steps carefully and take your time, and you will be able to complete the job successfully.