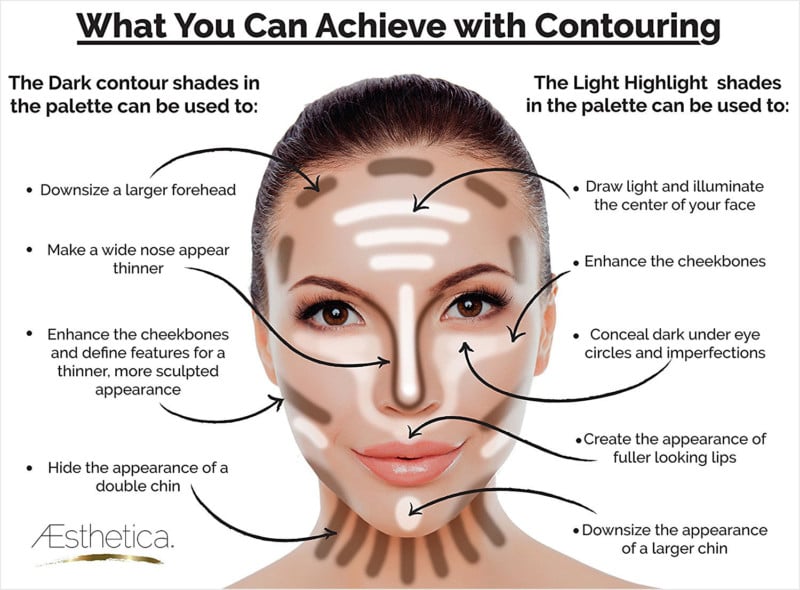
When it comes to contouring, using the right brush is essential to achieve a flawless, sculpted look. Contouring involves using makeup to create shadows and highlights on the face, enhancing its natural contours and giving it a more defined appearance.
The best brush for contouring should be angled and have a firm yet soft texture, such as a tapered kabuki or angled contour brush. These brushes allow for precise application and blending, helping to create a natural-looking contour that complements the face shape.
Using the right brush for contouring makes the process easier and more effective. It ensures that the product is applied smoothly and evenly, without harsh lines or streaks. Additionally, the angled shape of the brush helps to lift and define the cheekbones, jawline, and nose, creating a more contoured and chiseled look.
Read also:The Ultimate Guide To Gdragon From Kpop Icon To Fashion Pioneer
What Brush to Use for Contour
When it comes to contouring, choosing the right brush is crucial for achieving a flawless and defined look. Here are seven key aspects to consider:
- Angled shape: Allows for precise application and blending.
- Tapered design: Helps to create a natural-looking contour.
- Firm yet soft bristles: Ensures smooth and even application.
- Synthetic or natural fibers: Both options work well, depending on preference.
- Kabuki style: Ideal for larger areas of the face, such as the cheekbones.
- Angled contour brush: Specifically designed for contouring the jawline and nose.
- Size and density: Choose a brush that is appropriate for the size of your face and the desired intensity of contour.
By considering these key aspects, you can select the perfect brush for your contouring needs. The right brush will help you create a sculpted and defined look that enhances your natural features.
1. Angled shape
Contouring involves creating shadows and highlights to enhance the natural contours of the face. Using a brush with an angled shape is essential for achieving a precise and blended application.
- Precise Application: The angled shape allows for targeted application of contouring products, ensuring that the product is placed exactly where it is needed to create shadows and definition.
- Blending: The angled shape also facilitates seamless blending, allowing you to create smooth transitions between different shades and areas of contouring.
- Control: The angled shape provides greater control over the application, enabling you to create subtle or more dramatic contours as desired.
- Versatility: Angled brushes can be used for contouring various areas of the face, including the cheekbones, jawline, and nose.
Overall, the angled shape of a contour brush is crucial for achieving a precise, blended, and controlled application, which is essential for creating a flawless contoured look.
2. Tapered design
In the realm of contouring, achieving a natural-looking finish is paramount. This is where the tapered design of a contour brush plays a crucial role.
A tapered brush features bristles that gradually become shorter towards the tip. This unique design allows for a seamless blending of contouring products, resulting in a subtle and natural-looking contour.
Read also:Lydia Tartagliass Stunning Before And After Smile Transformation
Unlike brushes with blunt or flat edges, a tapered brush prevents harsh lines and allows for a more precise application. The shorter bristles at the tip provide greater control, enabling you to contour specific areas of the face, such as the hollows of the cheeks or the sides of the nose, without overdoing the effect.
Furthermore, the tapered design mimics the natural contours of the face, making it easier to create a contour that complements your unique features. By following the shape of your bone structure, you can enhance your natural beauty without creating an artificial or exaggerated look.
In essence, the tapered design of a contour brush is indispensable for achieving a natural-looking contour. It allows for precise application, seamless blending, and a that enhances your features without overpowering them.
3. Firm yet soft bristles
In the art of contouring, achieving a smooth and even application is essential for creating a flawless and natural-looking finish. This is where the significance of "firm yet soft bristles" in a contour brush comes into play.
Firm bristles provide the necessary control and precision for precise contouring. They allow you to deposit product exactly where it is needed, ensuring that the shadows and highlights are placed correctly to enhance your facial structure. Soft bristles, on the other hand, ensure that the product is blended seamlessly, preventing harsh lines or streaks that can ruin the overall effect.
The combination of firm yet soft bristles creates a brush that is both effective and versatile. It allows you to create both sharp contours and soft, diffused transitions, giving you complete control over the intensity and placement of your contour. This is particularly important when contouring different areas of the face, as each area may require a slightly different touch.
Furthermore, firm yet soft bristles are less likely to absorb excessive product, ensuring that the contouring application is buildable and controllable. This prevents the product from caking or looking unnatural, allowing you to achieve a flawless finish that lasts throughout the day.
In summary, the use of firm yet soft bristles in a contour brush is crucial for achieving a smooth and even application. It provides the necessary control, precision, and versatility to create a flawless and natural-looking contour that enhances your facial features.
4. Synthetic or natural fibers
When choosing a contour brush, the type of fibers used in its construction is an important consideration. Traditionally, natural fibers such as goat hair or squirrel hair were used in contour brushes, as they are soft and provide a more diffused application. However, synthetic fibers have become increasingly popular in recent years, as they are more durable, hypoallergenic, and often vegan-friendly.
Both synthetic and natural fiber brushes have their own advantages and disadvantages. Synthetic fibers are generally more durable and easier to clean, making them a good choice for beginners or those who use their brushes frequently. They are also less likely to absorb product, which can help to prevent caking or streaking. Natural fiber brushes, on the other hand, are often softer and more flexible, which can provide a more natural-looking finish. They are also less likely to irritate the skin, making them a good choice for those with sensitive skin.
Ultimately, the best type of brush for contouring is the one that works best for your individual needs and preferences. If you are unsure which type of brush to choose, it is a good idea to try out both synthetic and natural fiber brushes to see which one you prefer. Experimenting with different brush shapes and sizes can also help you to find the perfect brush for your contouring routine.
5. Kabuki style
When it comes to contouring, choosing the right brush is essential for achieving a flawless and defined look. Kabuki brushes are a popular choice for contouring larger areas of the face, such as the cheekbones, due to their unique design and functionality.
- Densely packed bristles: Kabuki brushes feature densely packed bristles that provide excellent coverage and blending, making them ideal for applying contouring products to larger areas of the face. The densely packed bristles help to distribute the product evenly, creating a smooth and seamless finish.
- Rounded shape: Kabuki brushes have a rounded shape that conforms to the contours of the face, allowing for precise and targeted application. The rounded shape also helps to blend the contouring product seamlessly, preventing harsh lines or streaks.
- Versatile: Kabuki brushes are not only suitable for contouring but can also be used for applying other makeup products, such as foundation, blush, and bronzer. Their versatility makes them a valuable addition to any makeup kit.
Overall, the combination of densely packed bristles, rounded shape, and versatility makes Kabuki brushes an excellent choice for contouring larger areas of the face, such as the cheekbones. They provide excellent coverage, blending, and precision, helping to create a flawless and defined contoured look.
6. Angled contour brush
In the realm of contouring, the angled contour brush holds a significant place, specifically tailored to enhance the contours of the jawline and nose. Its unique design and functionality make it an indispensable tool in achieving a defined and sculpted look.
- Precise Application: The angled shape of the brush allows for targeted application of contouring products along the jawline and nose. This precision is crucial for creating sharp and defined contours that enhance the facial structure.
- Control and Definition: The angled design provides greater control over the placement and intensity of contouring. This enables you to create subtle or more dramatic contours, depending on your desired look.
- Blending and Smoothing: Despite its angled shape, the brush is designed to blend and smooth the contouring products seamlessly. This prevents harsh lines or streaks, ensuring a natural-looking finish.
- Multipurpose Functionality: While primarily used for contouring the jawline and nose, angled contour brushes can also be utilized for other areas of the face, such as the hollows of the cheeks or the sides of the forehead.
In summary, the angled contour brush is a specialized tool that caters to the unique contours of the jawline and nose. Its angled shape, precision, control, and blending capabilities make it an essential choice for achieving a sculpted and defined look.
7. Size and density
The size and density of the brush you choose for contouring play a crucial role in achieving your desired look. A larger brush with denser bristles is ideal for creating a more intense contour on a larger face, while a smaller brush with less dense bristles is better suited for a more subtle contour on a smaller face. The density of the bristles also affects the intensity of the contour; denser bristles will pick up and deposit more product, resulting in a more pronounced contour.
For example, if you have a large face and want to create a dramatic contour, you might choose a large kabuki brush with densely packed bristles. This type of brush will allow you to apply the contour product quickly and evenly, and the dense bristles will help to blend the product seamlessly. If you have a smaller face and want to create a more subtle contour, you might choose a smaller angled brush with less dense bristles. This type of brush will give you more control over the placement of the product, and the less dense bristles will help to create a softer, more diffused look.
Understanding the relationship between the size and density of your contour brush and the desired intensity of your contour is essential for achieving a flawless and natural-looking finish. By choosing the right brush for your face and your desired look, you can create a contoured look that enhances your features and gives you a polished and professional appearance.
Frequently Asked Questions about Contour Brushes
Contouring involves the use of makeup to create shadows and highlights on the face, enhancing its natural contours. Choosing the right brush is crucial for achieving a seamless and natural-looking finish. Here are some frequently asked questions about contour brushes to help you make an informed choice:
Question 1: What type of brush is best for contouring?Angled contour brushes are specifically designed for contouring the face. They feature a slanted shape that allows for precise application and blending along the hollows of the cheeks, jawline, and nose.
Question 2: What are the key features to look for in a contour brush?Consider the following factors when selecting a contour brush: angled shape, firm yet soft bristles, synthetic or natural fibers (depending on preference), and appropriate size and density for your face shape and desired contour intensity.
Question 3: Can I use a regular makeup brush for contouring?While it is possible to use a regular makeup brush for contouring, it may not provide the same level of precision and control as a dedicated contour brush. Contour brushes are specifically designed to fit the contours of the face and facilitate seamless blending.
Question 4: How do I clean my contour brush?Regularly cleaning your contour brush is essential to maintain its performance and hygiene. Use a mild brush cleaner or shampoo, gently massage the bristles, and rinse thoroughly. Allow the brush to dry completely before storing it.
Question 5: How often should I replace my contour brush?The frequency of brush replacement depends on usage and care. With proper cleaning and storage, a contour brush can last for several months to a year. If you notice significant shedding or damage to the bristles, it may be time to replace the brush.
Question 6: What are some tips for using a contour brush effectively?Start with a light hand and gradually build up the intensity of the contour. Use short, feathery strokes and blend thoroughly to avoid harsh lines. Consider the shape of your face and apply the contour accordingly to enhance your natural features.
Understanding the basics of contour brushes and their proper use can help you achieve a flawless and sculpted look. By selecting the right brush and following these tips, you can master the art of contouring and elevate your makeup routine.
Transition to the next article section: Exploring Contouring Techniques
Tips for Choosing the Right Contour Brush
Choosing the right contour brush is essential for achieving a flawless and natural-looking contour. Here are some tips to help you make the best choice:
Tip 1: Consider the Shape of Your Face
The shape of your face will determine the type of contour brush that is best for you. If you have a round face, you will want to use a brush with a more angled shape to help create definition. If you have an oval face, you can use a brush with a more rounded shape to create a softer contour. And if you have a square face, you will want to use a brush with a more tapered shape to help soften the angles of your face.
Tip 2: Choose the Right Bristle Type
The type of bristles on your contour brush will also affect the finish of your contour. Natural bristles are softer and more flexible, which makes them ideal for creating a more diffused and natural-looking contour. Synthetic bristles are firmer and more durable, which makes them ideal for creating a more defined and dramatic contour.
Tip 3: Consider the Size of the Brush
The size of your contour brush will also affect the intensity of your contour. A larger brush will create a more diffused and natural-looking contour, while a smaller brush will create a more defined and dramatic contour. Choose the size of your brush based on the desired intensity of your contour.
Tip 4: Experiment with Different Brushes
The best way to find the right contour brush for you is to experiment with different brushes. Try out different shapes, sizes, and bristle types until you find the one that works best for you and your desired look.
Tip 5: Keep Your Brushes Clean
To keep your contour brushes in good condition, it is important to clean them regularly. Use a mild soap and water to clean your brushes, and be sure to rinse them thoroughly. Allow your brushes to dry completely before storing them.
By following these tips, you can choose the right contour brush for your needs and achieve a flawless and natural-looking contour.
Summary of Key Takeaways:
- Consider the shape of your face when choosing a contour brush.
- Choose the right bristle type based on the desired finish of your contour.
- Select the size of your brush based on the intensity of your contour.
- Experiment with different brushes to find the one that works best for you.
- Keep your contour brushes clean to maintain their performance.
Transition to the Article's Conclusion:
Choosing the right contour brush is an important step in achieving a flawless and natural-looking contour. By following these tips, you can find the perfect brush for your needs and create a contoured look that enhances your natural features.
Conclusion
Selecting the appropriate contour brush is crucial for achieving a flawless and sculpted look. This guide has explored the key considerations when choosing a contour brush, including the shape of your face, the type of bristles, the size of the brush, and the importance of experimentation and proper brush care.
By understanding these factors, you can make an informed decision and choose the perfect contour brush for your needs. Remember, the right brush will empower you to enhance your natural features, define your contours, and create a polished and professional appearance. Embrace the art of contouring and elevate your makeup routine to new heights.